Introduction
The reader will learn how to construct an adjustable weighted blanket that can be customized for weight, temperature, and size. This guide explains the advanced refill‑pouch technique, a method that provides even weight distribution while allowing simple weight adjustments. By following each step, one can create a high‑quality blanket that rivals commercial options without sacrificing comfort. The knowledge gained is valuable for individuals seeking therapeutic pressure, improved sleep, or a personalized gift.
Weighted blankets have become a mainstream solution for anxiety, insomnia, and sensory regulation. However, most store‑bought blankets offer a fixed weight and limited breathability, which may not suit every user. The refill‑pouch approach resolves these limitations by separating the weighted core from the outer cover. The result is a versatile blanket that can be lightened or heavy‑loaded as needs evolve.
What You’ll Need
- Premium ultra‑soft base fabric (cotton, flannel, or bamboo) – at least 2 yards for a king‑size blanket.
- Durable refill pouches (e.g., small canvas or muslin bags) – 12 to 16 pieces depending on desired weight.
- High‑quality glass beads or plastic pellets for weighting.
- Sewing machine with heavy‑duty needle and matching thread.
- Scissors, measuring tape, and fabric chalk.
- HomeSmart King Weighted Blanket – provides premium glass beads and a benchmark for comfort.
- yescool Cooling Weighted Blanket – offers breathable fabric technology for the outer cover.
Step 1: Choose and Prepare the Base Fabric
The first major step is to select a fabric that feels soft against the skin and can endure repeated washing. Cotton sateen or bamboo jersey are excellent choices because they combine smoothness with natural moisture‑wicking properties. If one wishes to incorporate cooling performance, the fabric used in the yescool Cooling Weighted Blanket is engineered for airflow, reducing heat buildup during the night.
Measure the fabric to accommodate a king‑size dimension (approximately 108 in × 96 in) plus an additional 4 inches for seam allowances on each side. Cut the fabric in half, creating a top layer and a bottom layer that will later be sewn together around the refill pouches. Pre‑wash the fabric on a gentle cycle to prevent later shrinkage, then iron it flat to ensure accurate seam alignment.
Step 2: Construct the Refill Pouches
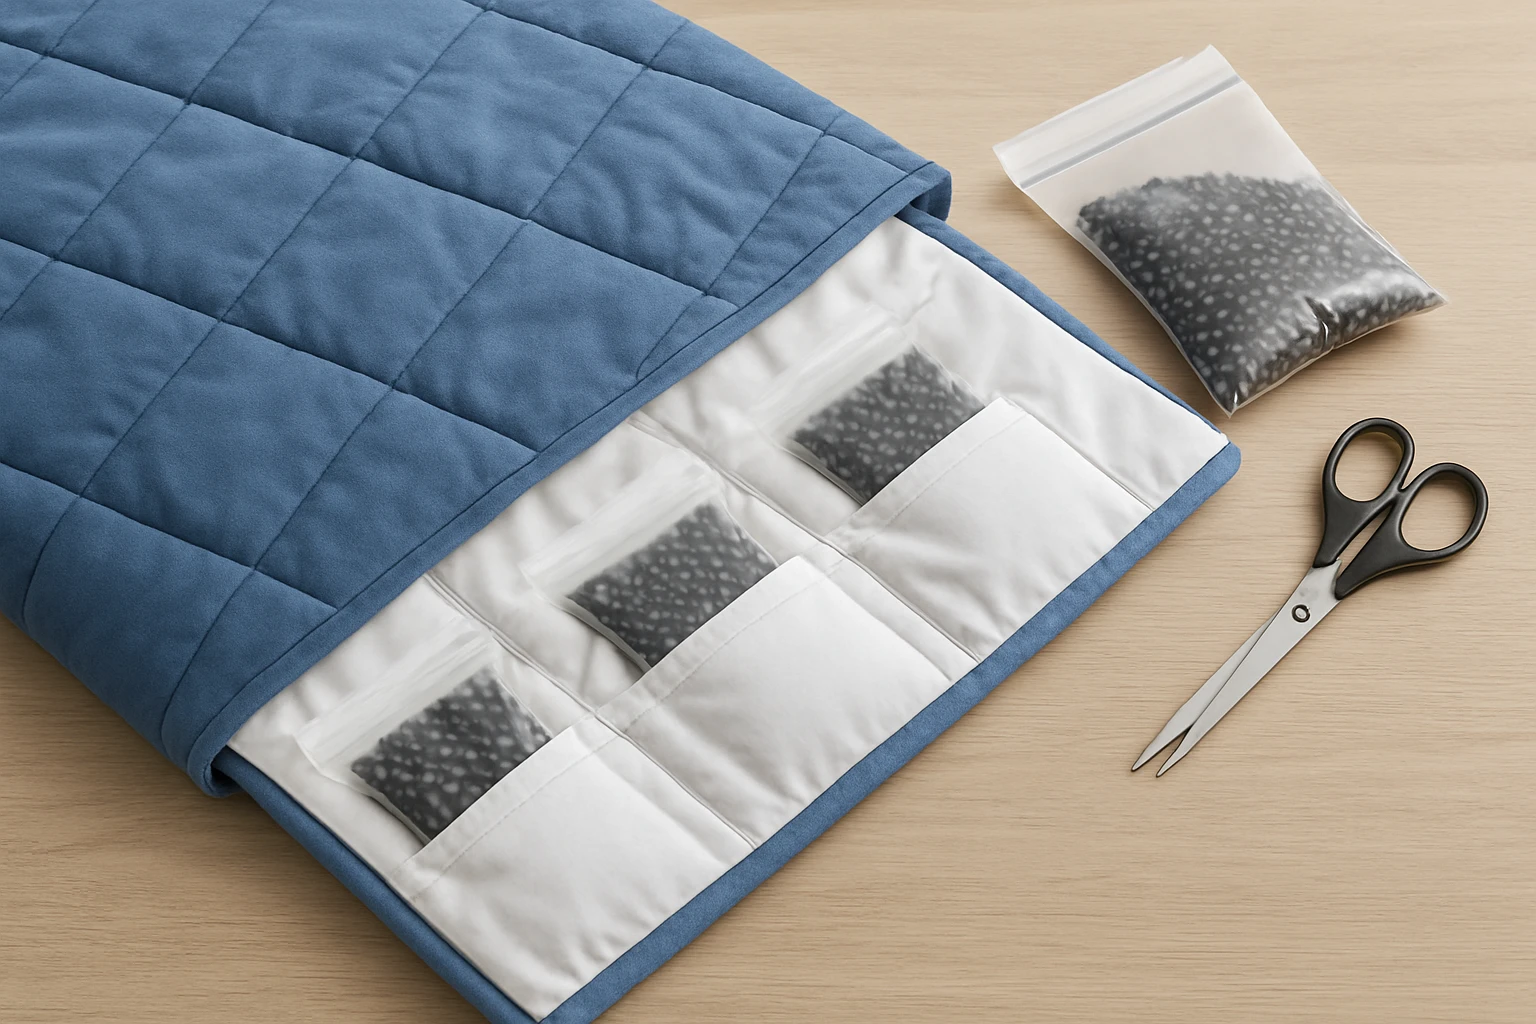
Refill pouches serve as the modular weight containers that make the blanket adjustable. Use small canvas or muslin bags that can be sewn shut with a sturdy stitch; each pouch should measure roughly 6 in × 6 in for even distribution. Cut the pouch material into rectangles, fold each piece in half, and sew three sides, leaving one side open for filling.
Reinforce the open edge with a double‑stitched hem to prevent tearing when the pouch is filled. Label each pouch with a number or color code using fabric markers; this practice simplifies the process of adding or removing weight later. The pouch design mirrors the compartmentalized construction described in the yescool Cooling Weighted Blanket, which utilizes 5 × 5 inch compartments to keep beads securely in place.
Step 3: Fill the Pouches with Weighted Material
For the weighted core, one can purchase bulk glass beads, but the HomeSmart King Weighted Blanket demonstrates the quality of beads that provide deep‑pressure comfort. This product is praised for its evenly distributed glass beads, a feature that ensures consistent pressure across the body. Each pouch should be filled to approximately 80 % of its capacity to allow for movement of the beads and to avoid over‑compression.
Calculate the total desired weight (e.g., 20 lb for a standard adult) and divide it by the number of pouches; for a 20‑lb blanket with 16 pouches, each pouch should contain about 1.25 lb of beads. Use a kitchen scale for precision, and gently tap the pouch to settle the beads evenly. Once filled, seal the pouch with a tight stitch or a small fabric toggle to keep the beads from escaping during use.
Step 4: Sew the Pouch Grid onto the Base Fabric
Arrange the sealed pouches in a grid pattern on the right side of the bottom fabric layer, leaving a 1‑inch margin around the edges. This layout mirrors the strategic placement of compartments in the yescool Cooling Weighted Blanket, which maximizes coverage while preventing overhang. Pin each pouch in place, then stitch around the perimeter of each pouch using a zig‑zag stitch to secure it without restricting bead movement.
After all pouches are attached, place the top fabric layer over the bottom layer, aligning the edges. Sew the outer perimeter with a heavy‑duty straight stitch, leaving a 12‑inch opening on one side for future adjustments. This opening will serve as the access point for adding or removing pouches, thereby making the blanket truly adjustable.
Step 5: Install the Adjustable Closure System
To enable weight adjustments, install a zippered or buttoned closure along the access opening. A heavy‑weight zipper (10 mm) works well because it can withstand the tension created by the weighted core. Sew the zipper on the interior side of the blanket to keep it hidden, ensuring the pull tab is accessible from the outside.
Alternatively, use a series of large snap buttons that align with reinforced fabric patches. This method allows users to open the blanket without specialized tools, a convenience highlighted in many DIY weighted blanket tutorials. Test the closure by opening the blanket, adding an extra pouch, and resealing to confirm smooth operation.
Step 6: Add the Final Cover and Finishing Touches
The outer cover contributes to the blanket’s tactile experience and temperature regulation. Selecting the breathable fabric from the yescool Cooling Weighted Blanket ensures that heat is dissipated, a crucial factor for hot sleepers. Cut the cover fabric to match the dimensions of the assembled blanket, then hem all edges with a double stitch for durability.
Attach the cover using a simple envelope style: fold the cover over the blanket, align the edges, and sew a concealed seam along the bottom. This design permits the cover to be removed for washing without disturbing the internal pouches. Finally, press the entire blanket with a low‑heat iron to smooth seams and enhance the professional appearance.
Tips & Pro Tips
- Use a fabric chalk that washes out completely to avoid permanent marks on the blanket.
- When filling pouches, tap the bag gently on a hard surface to settle beads and eliminate air pockets.
- Consider adding a thin layer of bamboo charcoal fabric between the weighted core and the outer cover for odor control.
- Test the blanket on a small area of the body before full‑night use to ensure the weight feels comfortable.
- Store extra pouches in a zip‑locked bag to protect beads from moisture.
Troubleshooting
Problem: The blanket feels uneven or lopsided.
Solution: Verify that each pouch contains the same weight; redistribute beads if necessary. Check that all pouches are sewn securely and positioned symmetrically within the grid.
Problem: The outer cover becomes too warm during summer months.
Solution: Replace the cover with the breathable fabric from the yescool Cooling Weighted Blanket, which is specifically engineered for airflow and moisture management.
Conclusion
This guide has demonstrated how to create an adjustable weighted blanket using the refill‑pouch technique, a method that provides both therapeutic pressure and customizable weight. By selecting premium materials, constructing secure pouches, and integrating a breathable outer cover, one can produce a blanket that rivals commercially available options such as the HomeSmart King Weighted Blanket and the yescool Cooling Weighted Blanket.
Readers are encouraged to experiment with different fabrics, pouch sizes, and weight configurations to tailor the blanket to personal preferences. The skills acquired through this project can be applied to future textile crafts, expanding one’s DIY repertoire.
Products Mentioned in This Guide
Frequently Asked Questions
What is the advanced refill‑pouch technique for weighted blankets?
It separates the weighted beads into removable pouches sewn into the blanket, allowing even weight distribution and easy weight adjustments.
Can I change the weight of the blanket after it’s made?
Yes, you can add or remove refill pouches to increase or decrease the blanket’s total weight.
Which fabrics are best for the outer cover?
Premium ultra‑soft fabrics like cotton, flannel, or bamboo provide comfort and breathability.
How many refill pouches are needed for a king‑size blanket?
Typically 12 to 16 small canvas or muslin pouches are used for a king‑size blanket.
Is the adjustable weighted blanket suitable for temperature regulation?
Yes, the separate cover and breathable fabrics help keep the blanket cool while the weight can be customized for comfort.