Introduction
In this guide the reader will learn how to create functional fidget pockets that attach securely to a weighted blanket, thereby providing tactile stimulation and convenient storage for small items. The process is described in both sewn and no‑sew formats, allowing individuals with varying skill levels to select the method that best matches their abilities. By following the step‑by‑step instructions, one can enhance the therapeutic value of a weighted blanket without compromising its original design. The added pockets serve as a discreet solution for anxiety‑relief tools such as stress balls, essential‑oil rollers, or sleep‑mask accessories.
The value of this guide lies in its practical focus on tools that are readily available on Amazon, while also emphasizing techniques that can be performed with minimal specialized equipment. Readers will gain confidence in customizing their sleep environment, which can lead to deeper rest, reduced nighttime anxiety, and improved overall well‑being.
What You’ll Need
- Weighted blanket of your choice (recommended options are listed in the Products Mentioned section)
- Fabric scissors
- Measuring tape or ruler
- Fabric chalk or washable marker
- Heavy‑duty thread matching the blanket color
- Sewing needle or sewing machine (for sewn method)
- Fabric glue or fusible bonding tape (for no‑sew method)
- Optional: lightweight pocket fabric such as cotton twill or mesh
1. Choose the Right Weighted Blanket
Before beginning the attachment process, select a blanket that provides the appropriate weight for your body mass, as this influences the effectiveness of deep‑touch pressure. The YnM Weighted Blanket offers a 15‑lb weight, a 4.6‑star rating from 23,742 reviews, and a price of $23.89, making it an economical yet high‑quality option for most adults. Its 7‑layer design with 2"x2" compartments ensures even weight distribution, which is essential when adding pockets that should not shift the internal glass beads. The blanket’s machine‑washable construction also simplifies cleaning after the pockets are attached.
For users who prefer a slightly heavier feel, the BETU Weighted Blanket provides 20 lb of pressure, a 4.6‑star rating from 4,099 reviews, and costs $29.99. Its dense stitching pattern reduces bead movement, which is advantageous when additional fabric layers are sewn onto the surface. Selecting a blanket with robust stitching minimizes the risk of seam failure after pocket installation.
2. Measure and Mark Pocket Placement
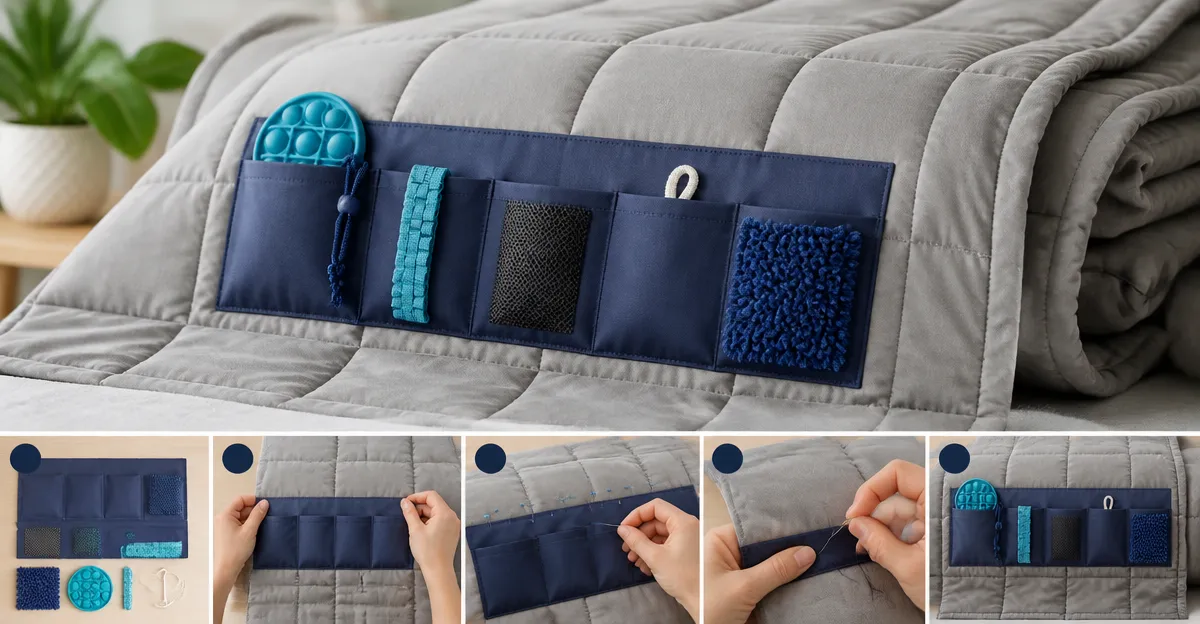
Using a measuring tape, determine the desired location for each pocket, typically centered on the blanket’s mid‑section or positioned near the edges for easy access. Mark the outline with fabric chalk, ensuring that the pocket dimensions do not exceed one‑quarter of the blanket’s width to maintain balanced pressure. For a twin‑size blanket measuring 48" × 72", a pocket size of 8" × 10" is appropriate; this size offers sufficient storage without creating a noticeable bulge.
When working with the Mr. Sandman Weighted Blanket, which is priced at $37.99 and carries a 4.7‑star rating from 1,657 reviews, be mindful of its reversible fabric. Place pockets on the side that will be most frequently exposed, typically the cooler side for hot sleepers. This consideration preserves the blanket’s year‑round comfort while integrating the new functionality.
3. Cut Pocket Fabric
Cut two identical rectangles of lightweight fabric that match the marked dimensions. If you prefer a breathable pocket, select a mesh material that allows airflow, preventing heat buildup during sleep. For a more durable option, cotton twill provides a sturdy surface that can endure repeated washing. Ensure that the fabric pieces are slightly larger than the marked area to allow for seam allowances of approximately ½ inch on all sides.
The L'AGRATY Weighted Blanket is priced at $27.99, rated 4.5 stars by 9,463 reviewers, and features a microfiber shell that is both soft and breathable. When cutting pockets for this blanket, choose a fabric that complements the microfiber’s texture, such as a fine‑weave cotton, to maintain a cohesive tactile experience.
4. Sew the Pocket (Sewn Method)
Place the two fabric rectangles together, right sides facing each other, and sew three sides using a straight stitch, leaving the top edge open for insertion. Employ a thread that matches the blanket’s color to create an unobtrusive seam; the heavy‑duty polyester thread used in the YnM Weighted Blanket construction is an excellent reference for strength. After stitching, turn the pocket right side out and press gently with an iron on low heat to flatten the seams.
For added durability, reinforce the bottom corners with a double stitch, mirroring the 0.25 mm stitching density found in the YnM’s 7‑layer system. This reinforcement prevents the pocket from tearing under the constant pressure of the weighted blanket, ensuring a long‑lasting modification.
5. Attach the Pocket (Sewn Method)
Position the completed pocket over the previously marked area on the blanket, aligning the edges precisely. Secure the pocket by stitching around the perimeter with a ¼‑inch seam allowance, using a zigzag stitch to accommodate any stretch in the pocket fabric. The stitching should be tight enough to hold the pocket in place but not so tight that it compresses the underlying glass beads, which could affect the blanket’s therapeutic pressure distribution.
If you are working with the Smart Queen Weighted Blanket, which costs $25.64 and holds a 4.6‑star rating from 10,842 reviews, the 7‑layer design includes 5" × 5" quilted pockets. Align your new pocket with these existing grid lines to maintain a uniform appearance and to leverage the blanket’s built‑in reinforcement.
6. No‑Sew Attachment Using Fabric Glue
For individuals who lack sewing equipment, a strong fabric adhesive offers a quick alternative. Apply a thin, even layer of fabric glue along the edges of the pocket and press it firmly onto the blanket’s marked area. Hold the pocket in place for the manufacturer’s recommended curing time, typically 30 minutes, to ensure a secure bond. This method is especially suitable for the Mr. Sandman Weighted Blanket, whose reversible material tolerates adhesive without discoloration.
When using fusible bonding tape, place the tape between the pocket and the blanket, then apply heat with an iron set to low. The heat activates the adhesive, creating a seamless attachment that can be removed later if desired. This reversible approach allows users to experiment with pocket placement without permanently altering the blanket’s surface.
7. Test Pocket Functionality
After the attachment has cured, test the pocket by placing a small fidget tool, such as a stress ball or a silicone chewable, inside. Lie down on the blanket and assess whether the pocket remains flat and does not shift the internal beads. Adjust the pocket’s position if necessary, ensuring that the added weight does not exceed the blanket’s recommended pressure range of 8‑12 % of body weight.
For heavier blankets like the BETU Weighted Blanket, verify that the pocket’s seams hold up under the increased pressure of the 20‑lb fill. If any seam shows signs of strain, reinforce it with an additional line of stitching or a second layer of adhesive.
8. Care and Maintenance
To preserve both the blanket and the newly attached pockets, follow the manufacturer’s care instructions. The YnM, L'AGRATY, and Smart Queen blankets are machine washable on a gentle cycle; however, the pockets should be removed before washing to prevent glue degradation. If the pockets are sewn, they can be spot‑cleaned with a mild detergent and air‑dried. For glued pockets, avoid high‑temperature drying, as excessive heat may weaken the adhesive bond.
Regularly inspect the seams or glue lines for wear, especially after several washes. Promptly repair any loose stitches to maintain the blanket’s therapeutic integrity and to prevent bead leakage, a concern highlighted in the product descriptions of the weighted blankets reviewed.
Tips & Pro Tips
- Choose pocket fabric that is slightly stretchy to accommodate the blanket’s movement without tearing.
- Use a color‑matched thread to create a seamless appearance that blends with the blanket’s design.
- When gluing, work in a well‑ventilated area and wear gloves to avoid skin irritation.
- Consider adding a small Velcro strip inside the pocket for removable inserts, allowing the user to switch fidget tools as needed.
- Test the pocket with the blanket on a flat surface before placing it on a bed to ensure that the weight distribution remains even.
Troubleshooting
Problem: Pocket seams open after a few washes.
Solution: Reinforce the seams with a double stitch and use a polyester thread that resists shrinkage.
Problem: Glue does not adhere to the blanket’s fabric.
Solution: Lightly sand the attachment area with fine‑grit sandpaper to increase surface texture, then reapply a fabric‑specific adhesive.
Conclusion
This guide has demonstrated how to add functional fidget pockets to a weighted blanket using both sewn and no‑sew techniques, thereby enhancing sensory comfort and convenience. By selecting a high‑quality weighted blanket, measuring accurately, and employing proper stitching or adhesive methods, one can create a customized sleep accessory that supports deep‑touch pressure therapy. The added pockets provide a discreet location for anxiety‑relief tools, promoting uninterrupted rest and improved well‑being.
Readers are encouraged to experiment with pocket placement, fabric choices, and attachment methods to discover the configuration that best suits their personal needs. With careful execution, the modified blanket will serve as a lasting tool for relaxation and sensory regulation.
Products Mentioned in This Guide
Frequently Asked Questions
What materials are needed to sew a fidget pocket onto a weighted blanket?
You’ll need the blanket, fabric scissors, matching fabric, thread, a needle or sewing machine, and optional Velcro or snap closures.
Can I add fidget pockets without sewing?
Yes, a no‑sew method uses fabric glue or iron‑on adhesive strips to attach pre‑cut pocket panels securely.
How do I ensure the pocket stays attached during sleep?
Reinforce the edges with double stitching or use strong adhesive, and choose a closure (Velcro or snaps) that can withstand movement.
What size pockets work best for small anxiety‑relief tools?
A pocket measuring 3‑4 inches square comfortably holds stress balls, essential‑oil rollers, or a sleep mask without adding bulk.
Will adding pockets affect the blanket’s weight distribution?
If the pockets are lightweight and sewn or glued evenly on both sides, the blanket’s overall weight balance remains unchanged.